

Cash flow is the money backbone of any successful real estate investment. Trust me, I know. It doesn’t matter what type of approach you have in your investing. If you’re flipping properties or managing rentals, then knowing how money flows in and out of your investments is very necessary to long-term success. Real estate can be incredibly rewarding, but without good cash flow management, profits can disappear faster than expected.
I’ve put together my thoughts to help you understand the basics of cash flow, learn how to maximize it, and tackle common challenges. No matter if you’re just starting or already experienced, I think these insights will help you make much better decisions and build financial stability.
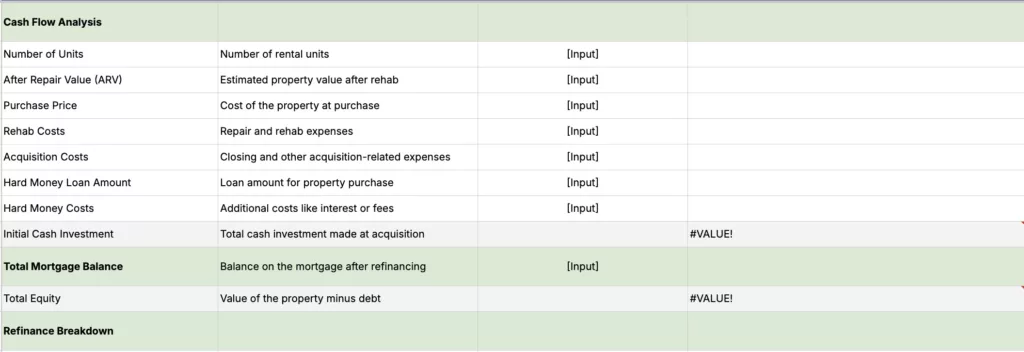
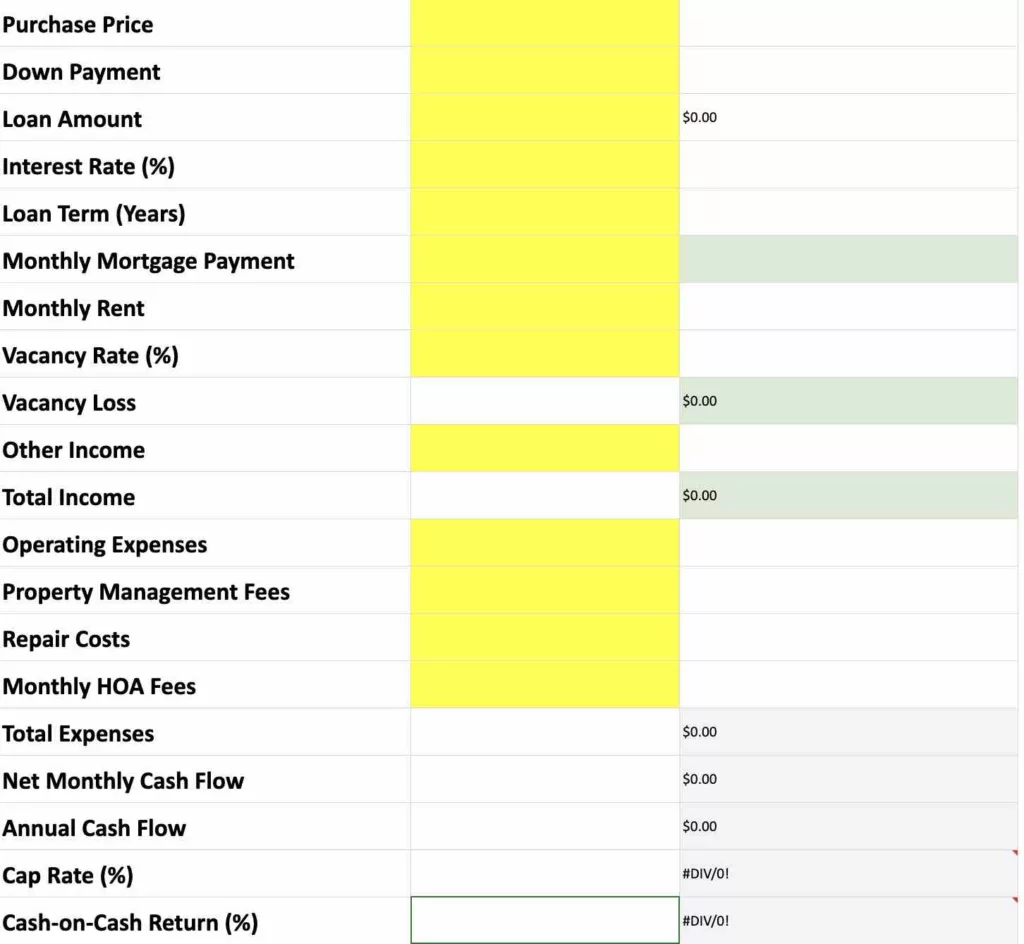
Real Estate Cash Flow Calculator
Enter the details below to calculate your cash flow and key metrics.
Results:
You Can Also Download Our Free Real Estate Cash Flow in a Spreadsheet Format
Excel | Google Sheets

Disclaimer – the calculator and the spreadsheet are for informational purposes only. Please do not substitute it for financial advice from a licensed financial professional. A lot of these numbers may be estimates, so it’s always a good idea to double check the math.
What the Heck is Cash Flow in Real Estate Anyways?
Great question. It’s a pretty straight forward answer.
Cash flow is the money left over after you pay all the expenses for your property, such as mortgages, taxes, insurance, and repairs. It’s simple to figure out.
Cash Flow = Income − Expenses
Positive vs. Negative Cash Flow
There are two types of cash flow.
- Positive Cash Flow happens when your property earns more than it costs to maintain. For example, if your rental income is $2,500 a month, and your expenses total $2,000, you’ve got $500 in positive cash flow.
- Negative Cash Flow occurs when your expenses are higher than your income, leaving you with a loss. This might happen due to high debt payments, expensive repairs, or vacancies.

Here is Why the Real Estate Cash Flow Matters
Success in rental property investing means, at least to me, knowing all aspects of your financial situation. That starts with knowing your cash flow. Positive cash flow is how we bring stability in your rental property investments, and thus, you can get more opportunities. I’ve been using my free rental property calculator and spreadsheet to help me track this. I know that incorporating monthly mortgage payment and estimating your annual net operating income are easily done in a pre made spreadsheet. The helps in assessing a property’s potential. I hope you will find that this calculator provides you with a clear picture of how your investments are performing. Knowing your numbers is how we get to creating steady income, managing expenses, and growing your property’s long-term value.
I’ve been in situations where unforeseen costs hit, but strong cash flow has always been my safety net. That’s what makes tracking your income and expenses so necessary. My calculator is simple to use and helps you see beyond the basics, like your property value, to really understand how your investment is working for you. You can confidently plan for the future, reduce stress, and even take steps toward growing your portfolio. Download my free profit and loss spreadsheet today and start putting your real estate investments on the path to lasting success.
The Components of Real Estate Cash Flow
Knowing and learning cash flow involves breaking it down into its main parts.
1. Income
For rental properties, most income comes from tenant rent.
- Application fees
- Late fees
- Parking rentals
- Laundry or vending machine revenue (for multi-family units)
2. Expenses
Expenses are the costs of operating and maintaining the property.
- Mortgage payments (principal and interest)
- Property taxes
- Insurance premiums
- Utilities (if the landlord pays them)
- Maintenance and repairs
- Property management fees
- Marketing to attract tenants
3. Debt Service
Debt service includes the principal and interest payments for your loans. Getting good financing terms, like a low interest rate, can lower your costs and increase cash flow.
Tracking Cash Flow with KPIs
KPIs like Cash-on-Cash Return or Net Operating Income (NOI) can show your property’s financial health. You should continually review the relevant metrics regularly, because this helps you stay on track and adapt to changes in the market.
How to Maximize Cash Flow
Choose Properties with High Rental Potential
Pick properties in locations where rental demand is high.
- Nearby schools and transportation.
- Low crime rates.
- Strong job growth.
You should research market conditions for short term rental to price your rentals competitively and identify properties with steady income potential.
Negotiate the Best Financing
When securing a loan, shop around for favorable terms. Lower interest rates or longer repayment terms can reduce your monthly costs.
- Seller financing
- Partnering with other types of investors
- Adjustable-rate mortgages (for short-term investments)
Improve Property Management
This is very important. You should know who you hire. Having a great property manager can make an incredibly huge difference. Good management keeps tenants happy and expenses low.
- Screen tenants carefully to avoid evictions and ensure timely payments.
- Use property management software to automate rent collection and bookkeeping.
- Schedule regular maintenance to prevent costly repairs later.
Add New Income Streams
Did you know you can try different revenue methods? I’ve seen some creative ideas over the years. You should look for ways to earn extra income.
- Renting out premium parking spots or storage units.
- Installing coin-operated laundry machines.
- Charging tenants for additional services.
Tackling Common Cash Flow Problems
Dealing with Vacancies
I think you’ll find that having vacancies can hurt your cash flow, but you can attempt to minimize them by the following.
- Setting a rental price that’s competitive for your area.
- Using high-quality photos and marketing to attract tenants quickly.
- Advertising listings on platforms like Zillow or Apartments.com.
Managing Maintenance Costs
I know how postponing repairs can lead to bigger expenses later. You don’t want to fall into this situation. There are so many tools out there we can use, so I’m out of excuses to not be prepared. I think you should consider the following best practices.
- Scheduling regular property inspections.
- Keeping a reserve fund for repairs.
- Working with reliable local contractors for discounted rates.
Preparing for Surprise Expenses
We all are aware of how unexpected costs tend to come with real estate investing. You should plan for them. Here are a few ideas that you can try to get your going, or keep going.
- Make sure you have insurance to protect against natural disasters and liability.
- Try to keep three to six months’ worth of expenses in a reserve fund.
- Consistently Save for future property tax increases.
Some Real-Life Examples
A Success Example
I once worked with an investor who bought a duplex in a growing part of town for $400,000. They spent $30,000 on renovations, making the property more appealing. With tenants paying premium rent, the property brought in $3,500 in monthly income, while expenses were only $2,700. That left them $800 in positive monthly cash flow.
A Learning Example
Another investor I know didn’t budget properly for repairs and had to replace an HVAC system unexpectedly. They ended up with negative cash flow and learned the hard way to keep reserves and plan for maintenance.
Take Charge of Your Real Estate Cash Flow
Managing cash flow is both a skill and a strategy. Stick to a plan, and preparing for challenges so you can build a steady income. If you need extra guidance, reaching out to a real estate expert or coach can help you achieve success.
Check Back for Updates
I like to keep track of the current market value and other property details. I’ve encountered people who sometimes leave out details like monthly HOA fees, forgotten annual expenses, parking fees, and closing costs, just to name a few. One needs to include these when determining total cost, so your calculations are accurate. It doesn’t matter if you pay cash or finance your investment, knowing all the things related to the cash invested upfront is very necessary and should be included. My calculator helps you break down the things like monthly rent amount and monthly maintenance to vacancy costs and other expenses. It even can include other income sections for other income streams like parking fees or laundry facilities, because those small details can add up to your total income and grow your annual income.
If you’re reviewing older properties or single family homes, you know they often require more maintenance, which is why it’s a smart move to calculate the annual rate for repairs on a monthly basis. My tool provides a convenient way to determine your cap rate and return on investment while considering the current market and asking price of any property you’re interested in. It factors in tools like the capitalization rate to give you a clear snapshot of your investment’s success. Keeping tabs on total cash flow and annual returns is crucial for long-term growth, and staying on top of your numbers helps make your investments work as hard as you do. Please go ahead and check back here on the regular, because I’m trying to consistently improve the calculator to make managing your properties even easier.
About the Author


Joseph E. Stephenson, REALTOR®
License #00054082 | Kansas & Missouri
Affiliated with Welch & Company (License #CO00000477)
Joseph E. Stephenson is a licensed real estate professional in Kansas and Missouri with a career built on dedication to integrity and client-focused service. To learn more about how Joseph can assist you in your real estate endeavors, visit his REALTOR® profile at realtor.com.
Connect with Joe and/or Listen to His Podcast


Verify Joe’s Real Estate License Credentials
Real Estate Agent License VerificationVerify Joe’s Business Credentials
Joseph E. Stephenson also operates a business named Stephenson Residential, LLC. You can verify the business at the Kansas Secretary of State’s website.
Verify Business Credentials